Thursday, August 19, 2010

Fedora: Install & configure Net-SNMP running on IPv6

I've install net-snmp on my fedora machine for 'secret' purpose :P
Here are some basic tutorial but it works for me and perhaps all fedora user. I've experienced some errors if directly install the net-snmp. Thus, I try to install perl first (latest version) before installing and afterwards I didn't face any error to install.

Step 1: Installing Perl from source
Download tar ball (.tar.gz) of the latest version with type (maint) here

login as root, go to directory where the tar ball is located, extract and go inside directory
$ su
# tar xzvf perl-version.tar.gz
# cd perl-version

now, we configure (with default setting) to confirm with your platform
# ./Configure -de

compile and install
# make && make install

Note that it won't be installed if there is an error

if it is successfully installed, try . .
$ perl -v

output will be the version of newly installed perl. In my case:
This is perl 5, version 12, subversion 1 (v5.12.1) built for i686-linux

Step 2: Installing net-snmp from source
Go to net-snmp page and download source file (.tar.gz) under 'current release'. Same thing, extract the tar file
# tar xzvf net-snmp-version.tar.gz
# cd net-snmp-version

Then, configure using several option (press enter for each prompt)
# ./configure --enable-ipv6 --with-transports="UDP UDPIPv6" --with-libs=-lpthread --with-perl-modules

finally compile and install
# make && make test && make install

remember, if any error occurs installation won't finish

Step 3: snmpd configuration file
Go to snmp directory
# cd /usr/local/share/snmp

Then, we can create snmpd.conf file using this command
# snmpconf

Would you like me to read them in? Their content will be merged with the
output files created by this session.

Valid answer examples: "all", "none","3","1,2,5"

Read in which (default = all): none

next . .

I can create the following types of configuration files for you.
Select the file type you wish to create:
(you can create more than one as you run this program)

1: snmpd.conf
2: snmptrapd.conf
3: snmp.conf

Other options: quit

Select File: 1

Lastly, type 'finished' and 'quit'. You will get output like this
The following files were created:

snmpd.conf

Now, edit this file and replace with all content posted here
# gedit snmpd.conf

and add this line after this line '# sec.name source community'
[...]

com2sec6 local ::1 public

[...]

save the file and close.

Now, Run snmpd first just on udp with IPv6 on port 161 (as root)
# snmpd udp6:161

Then, try snmpwalk (You should have IPv6 configured)
# snmpwalk -v 1 -c public 'ipv6:[::1]' IP-MIB::ipAdEntIfIndex

Output will be somehow like this
IP-MIB::ipAdEntIfIndex.10.1.27.140 = INTEGER: 3
IP-MIB::ipAdEntIfIndex.127.0.0.1 = INTEGER: 1

If you got this, so i think it works ;)
Wednesday, August 18, 2010

Where is my installed Wireshark?

So this is what happen this morning where we installed wireshark on my Fedora 12 PC. It is successfully installed but executable file doesn't appear anywhere.

To install:
yum install wireshark

What you have to do is just further install:
yum install wireshark-gnome

Bye2 :D

Tuesday, August 17, 2010

Net-SNMP Tutorial

Just followed good tutorial to configure Net-SNMP >> click here

Anyway, I experienced error while 'make' where  I got this error >>/usr/bin/ld: cannot find -lperl

I find the solution here

First, locate libperl.

Output:
/usr/lib/libperl.so.5.10
/usr/lib/libperl.so.5.10.0
...

(or similar)

Create soft link;
sudo ln -s /usr/lib/libperl.so.5.10 /usr/lib/libperl.so

Make sure the link is in the /usr/lib **same directory with the link point. 
That's all. Thank you.

**Credit to http://ashokachakra.blogspot.com/

Thursday, August 5, 2010

Playing your favorite radio station using Octoshape -- Linux (Little addition)

Okeh, I forgot to mention-- Uninstalling Octoshape.


In case your Octoshape doesnt work, or have any problem, or just you hate it, u want to remove it from your machine. Easy easy...


Just uninstall it from your machine. How to uninstall? Easy easy... -- Delete octoshape folder.

That is all.

If you want it back, re-install and enjoy. That's all. Have a nice day.

Tuesday, August 3, 2010

Playing your favorite radio station using Octoshape -- Linux


2) Open terminal, go to the path you download the plugin . Then, 

3) $ chmod +x octosetup-linux_i386.bin

4)  $ ./octosetup-linux_i386.bin

5) Go through the license agreement by clicking enter or space and reply yes when being prompted.

Do you agree to these license terms? [yes|no]
yes
Archive:  octoshape.installer.6085
  inflating: octoshape/eula.rtf     
  inflating: octoshape/eula.txt     
  inflating: octoshape/OctoshapeClient 
  inflating: octoshape/setup.xml    
 extracting: octoshape/sua-1002170-0-confirmed.txt 
 extracting: octoshape/sua-1002170-0-dynfiles.zip 
 extracting: octoshape/sua-1002170-0-marker.txt 
  inflating: octoshape/sua-1002170-0-module.xml 
  inflating: octoshape/sua-1002170-0-OctoshapeClientSUA 
 extracting: octoshape/sua-1002170-0-OctoshapeClientSUA.sig 
  inflating: octoshape/sua-1002170-0-suapack-versions.txt 
Go to octoshape and execute ./OctoshapeClient -url:octoshape:BROADCASTER.channel

 
Done installing.

6) You can play the radio at this point. But Octoshape default player is using MPlayer. You can either get MPlayer installed or, change default radio player by editing setup.xml (in octoshape folder)

$ gedit setup.xml
I am using rhythmbox, so I add this option.
Add -- PlayerExec="rhythmbox $url"


Save.

7) FINALLY,

For FLY FM listener:
$ ./OctoshapeClient -url:mpb.flyfm.mp3.high

For HOT FM listener:
$ ./OctoshapeClient -url:mpb.hotfm.mp3.high


The player you chose will automatically started and playing your favorite radio station. ENJOY, cheers.

Saturday, July 10, 2010

Streamyx: Sharing Internet on Fedora 12

I'm using streamyx for Internet connection at home. I've a laptop with an Ethernet card and a wireless card. Then, I started to google on how to share internet connection with other laptops using wireless connection since my LAN card is occupied with streamyx cable.
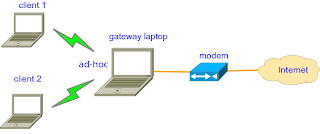
For setting up my machine as a gateway, it quite similar to previous post here, but it can simply be done by configuring firewall. Then, we can create an Ad-Hoc connection so that other machines (client) can simply connect to my laptop without the need of access point. In addition, in order to automatically configure IP address, gateway and DNS server address on client machine, we can set up DHCP server in the laptop (gateway machine). Following are the steps for make it works :

Note that all configuration is done on gateway machine.

Step 1: Connect to streamyx
Right-click on network manager applet, then choose 'Edit Connections..'

Select DSL tab and click 'Add' to add new connection. Then rename connection name to 'streamyx' or anything you want. Enter your username, password and service as shown in picture below. Tick connect automatically if want to allow connection on startup. Click 'Apply' to finish

Click on applet again, and now streamyx connection should be appear under 'Wired Networks'. Select to connect.

Step 2: Configure Firewall (from this step, all need to be done as root)
Open terminal and type
$ su
# system-config-firewall

Select 'Masquerading' and tick as bellow (thanks to KageSenshi)

Step 3: Setup DHCP server
First, install dhcpd (in fedora 12, dhcp package is using version 4)
# 'yum install dhcp

Check your DNS server to be used in dhcp configuration file
$ less /etc/resolv.conf

Output should be appear like this
# Generated by NetworkManager
nameserver 204.177.0.3
nameserver 204.177.1.12

Then, edit dhcpd configuration file (use familiar text editor such as gedit, vi or nano)
$ su -c 'gedit /etc/dhcp/dhcpd.conf'

Then, make it similar as bellow and match the address of DNS at 'option domain-name-servers'

# beginning of file
default-lease-time 86400;
max-lease-time 604800;
authoritative;
ddns-update-style interim;
option domain-name-servers 204.177.0.3
,204.177.1.12
;
subnet 192.168.1.0 netmask 255.255.255.0 {
range 192.168.1.1 192.168.1.5; # only 5 person can connect
option broadcast-address 192.168.1.6;
option routers 192.168.1.1; # gateway address
}

# end of file

Step 4: Create an Ad-Hoc connection
Enable wireless connection, then select 'Create New wireless Network'
Choose any wireless security you want or simply choose none. Click 'Create' to finnish.

Again right-click on the network manager applet and choose 'Edit Connections'. Then, under 'Wireless' tab, select your connection name and edit as follow

Click on applet, and select 'Connect to Hidden Wireless Network' and connect.

Finally, restart dhcp server
# sudo service dhcpd restart

Note that you need to connect to the created ad-hoc connection first (in my case, it is 'anyname') before you can start dhcp server.

Now, everyone near to you can see you Ad-hoc connection. Configure client's IP address using 'automatic configuration'. Once they connect to your ad-hoc connection through WiFi, they can surf to internet and facebooking all the time :P

References:

Sunday, June 13, 2010

IIUM FM


I'm IIUM student :) and I'm glad that IIUM has it own radio, which is broadcasting over the Internet. Users could simply go to this page http://livestream.iiu.edu.my/iiumfm/ and it will stream the radio using supported player in web browser. Nice huh?.. Hehe.

Beside that, for Linux user, you can simply use Rythmbox as follow:
Step 1: Make sure plugins are installed

ubuntu user,
$ sudo apt-get install ubuntu-restricted-extras

and fedora,
$ sudo yum install gstreamer-plugins-ugly gstreamer-plugins-bad gstreamer-ffmpeg

It is also necessary to install a bunch of codecs in here

Step 2: adding link
open your rythmbox, go to menu 'Music',click on 'New Internet Radio Station' and add this url
mms://livestream.iiu.edu.my/iiumfm

Then, go to side bar on Radio, then double click on the new added link.
That's it. Enjoy ;)