Showing posts with label mysql. Show all posts
Showing posts with label mysql. Show all posts
Saturday, March 12, 2011
MySQL LOAD_FILE() in Ubuntu, It Works!
Recently, I want to create a php site that will display images retrieved from MySQL database. I always prefer to work with CLI mode other than using query browser for create databases, tables, updating etc.
LOAD_FILE can be used to store images into database through MySQL command line (client). I'm using MySQL version 5.1.41 on my Ubuntu 10.04. Here are the simple steps:
Step 1: Initially we will create a database and tables
mysql> create database testdb;

Query OK, 1 row affected (0.00 sec)

mysql> use testdb;

Database changed

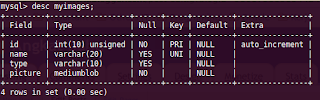
mysql> create table myimages

 -> (

 -> id integer unsigned not null auto_increment,

 -> name varchar(20),

 -> type varchar(10),

 -> picture mediumblob not null,

 -> primary key (id),

 -> unique (name)

 -> );

Query OK, 0 rows affected (0.09 sec)

mysql> desc myimages;
Step 2: Upload an image
At first, I've tried to upload an image from a directory located at '/home/user1/Pictures/ubuntu_logo.jpg'.
mysql> insert into myimages (name, type, picture) values ('xyz', 'jpeg', LOAD_FILE('/home/user1/Pictures/ubuntu_logo.jpg'));

ERROR 1048 (23000): Column 'picture' cannot be null
This error occurred because the result of LOAD_FILE('/home/user1/Pictures/ubuntu_logo.jpg') has return the NULL value probably due to privileges and permission of the /home/user1 directory which is belongs to user1.
The same problem also has been brought up in mysql forum.
After checked on /etc/passwd, it shows that the mysql's home directory is located at /var/lib/mysql/, where permission is fully given for mysql user.
Simply login as root user and copy the image to /var/lib/mysql or you may created your own directory such as /var/lib/mysql/all_images
$ sudo su

$ mkdir /var/lib/mysql/all_images

$ cp /home/user1/Pictures/ubuntu_logo.jpg /var/lib/mysql/all_images
Now, try to run the same insert command again with different directory.
mysql> insert into myimages (name, type, picture) values ('bz', 'jpeg', LOAD_FILE('/var/lib/mysql/all_images/ubuntu_logo.jpg'));

Query OK, 1 row affected (0.00 sec)
Yeah, it works!!

Wednesday, February 10, 2010
Setting Up LAMP + memcached on Ubuntu Server 9.10
This post will show a guide on how to setup LAMP with memcached on three machines. Perhaps this will help us on writing technical report..huahuha
We are currently running our performance test on our web and database server using memcached. The test is used to monitor the cpu and memory usage using cacti. Thanks to khairina for SNMP and cacti configuration :)
We have installed LAMP server in two 64-bit machines, whereas 1 machine running apache2 with php5 while another one running MySQL 5.1.
We also have a dedicated memcached server. Since we are using php5, thus we chosen php as our memcached client.
Then it can be simply tested using 'ab' (apache bench).
Step 1: Setting up Web Server (192.168.0.101)
Installing apache2 and php5
$ sudo apt-get install apache2 php5 libapache2-mod-php5
Note: In ubuntu, php5 will use php5-prefork by default
Installing MySQL module for php5
$ sudo apt-get install libapache2-mod-auth-mysql php5-mysql
Then, edit php configuration file to add mysql extension
$ sudo vi /etc/php5/apache2/php.ini
Then add this line
extension=msql.so
Installing memcache module for php5
$ apt-get install php5-memcache
Then, edit php configuration file to add memcached extension
$ sudo vi /etc/php5/apache2/php.ini
Then add this line
extension=memcache.so
To ease us in locating our php file on our web server, we have changed the default location.
Edit /etc/apache2/sites-available/default. Don't forget to backup it first. (use gedit,vi or nano)
$ sudo vi /etc/apache2/sites-available/default
Then, find this two lines.
DocumentRoot /var/www/
Edit it into preferred directory, so it become
DocumentRoot /home/username/web/
Make sure the directory exists
$ mkdir /home/username/web/
Restart apache2
$ sudo /etc/init.d/apache2 restart
Now, we can create our php code inside the web directory.
Step 2: Setting up Database Server (192.168.0.102)
Installing MySQL server 5.1
$ sudo apt-get install mysql-server
Then edit mysql configuration file to bind address so it can be connected from any machines
$ sudo vi /etc/mysql/my.cnf
Edit this line
bind-address = 127.0.0.1
to (MySQL server IP address)
bind-address = 192.168.0.102
then, restart mysql server
$ sudo /etc/init.d/mysql restart
Add a user to enable to mysql client connect from different host (as mysql server) see the manual here
Step 3: Installing Memcached (192.168.0.103)
Get the latest memcached source file (current version is 1.4.4) that can be download from this site. Then, follow this guide
Or simply install using apt-get. In ubuntu 9.10 the memcached version is 1.2.8
$ sudo apt-get install memcached
Create a file, put the php code below and save it as index.php into /home/username/web directory (or /var/www/ if haven't do any changes)
Open web browser the type http://webserver_ipaddress/index.php. Then, the memcached module for php5 can be found in this page as figure below

Now, we can test our web and database server :D
References:
Sunday, January 17, 2010
Mysql Cluster with Mysql 5.1 on Ubuntu Server 9.10
We're currently implementing memcached on mysql cluster using mysql 5.1. So, to make it quick, i followed a guide from howtoforge written by Peter Okupski in this site. It works for me.
There are several things need to be concerned before implementing this guide on ubuntu server 9.10.
- Don't install mysql-server5.1 from the repository using apt-get.
For me, it's easier to install mysql cluster by using source code in ubuntu. Source code can be downloaded form mysql site. On 'select platform' option, choose 'source code' and download the tar file mysql-cluster-gpl-[version].tar.gz
(Note: register, it is free!) - Install build-essential package to allow compiling source file
$ sudo apt-get install build-essential - Install developer's library for ncurses
$ sudo apt-get install libncurses5-dev
This will avoid an error:
configure error: No curses/termcap library found
Now, it's ready :-)
References:
http://www.howtoforge.com/setting-up-a-loadbalanced-mysql-cluster-with-mysql5.1
http://www.spiration.co.uk/post/1391/
http://www.spiration.co.uk/post/1391/
Subscribe to:
Posts (Atom)