Showing posts with label networking. Show all posts

Saturday, July 10, 2010

Streamyx: Sharing Internet on Fedora 12

I'm using streamyx for Internet connection at home. I've a laptop with an Ethernet card and a wireless card. Then, I started to google on how to share internet connection with other laptops using wireless connection since my LAN card is occupied with streamyx cable.
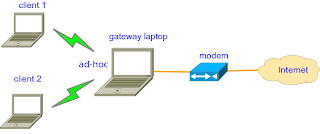
For setting up my machine as a gateway, it quite similar to previous post here, but it can simply be done by configuring firewall. Then, we can create an Ad-Hoc connection so that other machines (client) can simply connect to my laptop without the need of access point. In addition, in order to automatically configure IP address, gateway and DNS server address on client machine, we can set up DHCP server in the laptop (gateway machine). Following are the steps for make it works :

Note that all configuration is done on gateway machine.

Step 1: Connect to streamyx
Right-click on network manager applet, then choose 'Edit Connections..'
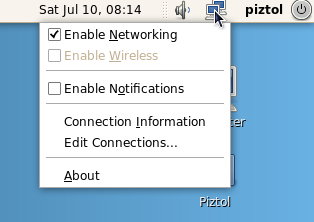
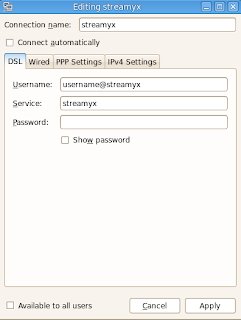
Select DSL tab and click 'Add' to add new connection. Then rename connection name to 'streamyx' or anything you want. Enter your username, password and service as shown in picture below. Tick connect automatically if want to allow connection on startup. Click 'Apply' to finish
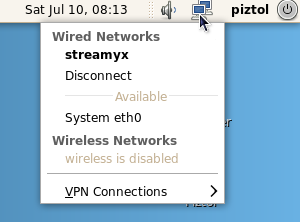
Click on applet again, and now streamyx connection should be appear under 'Wired Networks'. Select to connect.
Step 2: Configure Firewall (from this step, all need to be done as root)
Open terminal and type
$ su
# system-config-firewall

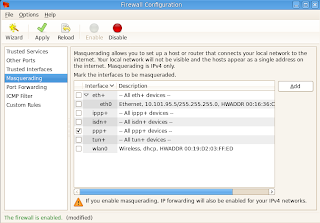
Select 'Masquerading' and tick as bellow (thanks to KageSenshi)
Step 3: Setup DHCP server
First, install dhcpd (in fedora 12, dhcp package is using version 4)
# 'yum install dhcp

Check your DNS server to be used in dhcp configuration file
$ less /etc/resolv.conf

Output should be appear like this
# Generated by NetworkManager
nameserver 204.177.0.3
nameserver 204.177.1.12

Then, edit dhcpd configuration file (use familiar text editor such as gedit, vi or nano)
$ su -c 'gedit /etc/dhcp/dhcpd.conf'

Then, make it similar as bellow and match the address of DNS at 'option domain-name-servers'

# beginning of file
default-lease-time 86400;
max-lease-time 604800;
authoritative;
ddns-update-style interim;
option domain-name-servers 204.177.0.3
,204.177.1.12
;
subnet 192.168.1.0 netmask 255.255.255.0 {
range 192.168.1.1 192.168.1.5; # only 5 person can connect
option broadcast-address 192.168.1.6;
option routers 192.168.1.1; # gateway address
}

# end of file

Step 4: Create an Ad-Hoc connection
Enable wireless connection, then select 'Create New wireless Network'
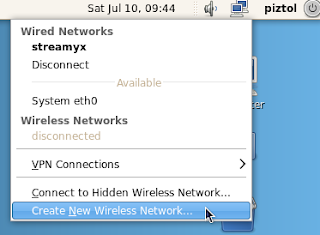
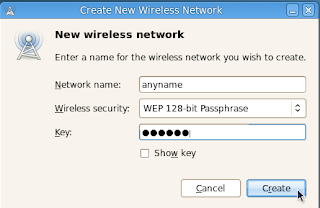
Choose any wireless security you want or simply choose none. Click 'Create' to finnish.
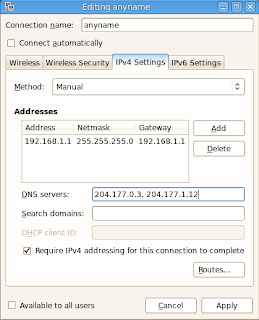
Again right-click on the network manager applet and choose 'Edit Connections'. Then, under 'Wireless' tab, select your connection name and edit as follow
Click on applet, and select 'Connect to Hidden Wireless Network' and connect.
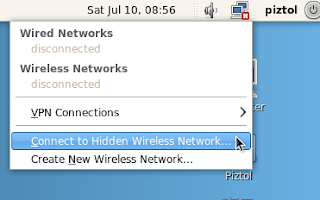
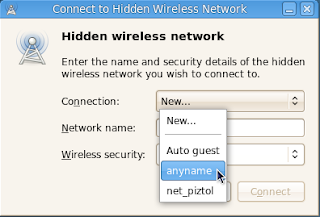
Finally, restart dhcp server
# sudo service dhcpd restart

Note that you need to connect to the created ad-hoc connection first (in my case, it is 'anyname') before you can start dhcp server.

Now, everyone near to you can see you Ad-hoc connection. Configure client's IP address using 'automatic configuration'. Once they connect to your ad-hoc connection through WiFi, they can surf to internet and facebooking all the time :P

References:

Sunday, January 10, 2010

Setting Up Gateway in Ubuntu

I just think how to set up simple gateway server for a LAN. After searched for a while, i found some useful guide (see references).
First, the server machine needs to have at least two interfaces, e.g. eth0 and eth1. In my case, I used eth0 for connecting to internet and eth1 for connecting LAN connection.
It is not necessarily use eth0 to be connected to Internet. It depends on your Internet connection. It could be wlan0, ppp0 etc. This also useful for connecting two different networks.

Assume that your machine will be used as a gateway. This guide will be based on the figure below:


IP address Configuration
In this guide, IP address for each host in LAN need to be configured manually, unless DHCP server is installed.

DNS Server and Gateway
All hosts in LANneed to have same DNS server as your machine has and add the IP address of your machine as a gateway in LAN hosts, so that the IP packets will be route to the Internet through your machine.

Configuration of 'Gateway' machine
Step 1: Find DNS server on your machine
$ cat /etc/resolv.conf

The output will be like this
# Generated by NetworkManager
nameserver 10.1.2.21
nameserver 10.0.0.92

Step 2: Enable IP forwarding
First, check the default value. There are two ways.
Note: 0 means it is disabled

1. using sysctl command.
$ sysctl net.ipv4.ip_forward
net.ipv4.ip_forward = 0

2. cat the file /proc/sys/net/ipv4/ip_forward.
$ cat /proc/sys/net/ipv4/ip_forward
0

Second, change the value temporarily, so that, it will reset to 0 when you have shutting down the machine.
$ sudo sysctl -w net.ipv4.ip_forward=1

Try to check again to see the changed value.

To permanently enable the IP forwarding, you need to edit sysctl configuration file. Use any familiar text editor such as nano, vi and gedit.
$ sudo gedit /etc/sysctl.conf

Find these two lines, and uncomment the second line (remove the # symbol)
Before:
# Uncomment the next line to enable packet forwarding for IPv4
#net.ipv4.ip_forward=1

After:
# Uncomment the next line to enable packet forwarding for IPv4
net.ipv4.ip_forward=1

or simply edit using this command:
$ sudo sed -i 's/#net.ipv4.ip_forward/net.ipv4.ip_forward/g' /etc/sysctl.conf

Then update the change made.
$ sudo sysctl -p /etc/sysctl.conf

Step 3: Configure NAT on IP tables
iptables is very useful for maintain tables of IPv4 packet filtering in linux kernel. It has lots of chain rule. For performing NAT we have the command above (see manual for details):
$ sudo iptables -t nat -A POSTROUTING -s 192.168.1.0/24 -o eth0 -j MASQUERADE

-t nat, an option of IP table to perform NAT at each packet matching.
-A POSTROUTING. The –A is used for append chain rule of –t and we use POSTROUTING for altering packets as they are about to go out.

-s indicates as source address from where the IP packet can route through the NAT. it should be followed by IP address along with the netmask. In this command it shows and IP address of 192.168.1.0 with subnet mask 255.255.255.0, which need to be written as 192.168.1.0/24. This IP will be used in LAN from 192.168.1.1 - 192.168.1.254. Your machine can use 192.168.1.1 for eth0 interface. (Google IP and subnet mask tutorial)

-o is used for name of an interface via which a packet is going to be sent (POSTROUTING). In this example, we used eth0 since it is the only interface that can be connected to internet.

-j should be followed by target extension. In this option we choose MASQUERADE. This target is only valid in the NAT table, in the POSTROUTING chain. Masquerading is equivalent to specifying a mapping to the IP address of the interface the packet is going out.

Now, restart your network service (not necessary)
$ sudo /etc/init.d/networking restart

We are done configuring IP forwarding, NAT and gateway on your machines. The next step is configuring IP address on LAN hosts.

Configuration of Hosts in LAN
Enter IP address to the hosts in range 192.168.1.2 - 192.168.1.254.
in the gateway field, put the IP address of 'gateway' machine, which is 192.168.1.1

Then, add the IP address for DNS server similar to the gateway configuration.

Last, restart the network for linux host. Note that the configuration will be the same for Windows hosts.
Done.

Check internet connection for the hosts in LAN
Hope this will help you. Enjoy!

References: