Saturday, March 12, 2011
MySQL LOAD_FILE() in Ubuntu, It Works!
Recently, I want to create a php site that will display images retrieved from MySQL database. I always prefer to work with CLI mode other than using query browser for create databases, tables, updating etc.
LOAD_FILE can be used to store images into database through MySQL command line (client). I'm using MySQL version 5.1.41 on my Ubuntu 10.04. Here are the simple steps:
Step 1: Initially we will create a database and tables
mysql> create database testdb;

Query OK, 1 row affected (0.00 sec)

mysql> use testdb;

Database changed

mysql> create table myimages

 -> (

 -> id integer unsigned not null auto_increment,

 -> name varchar(20),

 -> type varchar(10),

 -> picture mediumblob not null,

 -> primary key (id),

 -> unique (name)

 -> );

Query OK, 0 rows affected (0.09 sec)

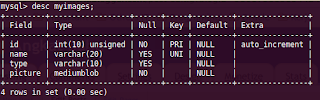
mysql> desc myimages;
Step 2: Upload an image
At first, I've tried to upload an image from a directory located at '/home/user1/Pictures/ubuntu_logo.jpg'.
mysql> insert into myimages (name, type, picture) values ('xyz', 'jpeg', LOAD_FILE('/home/user1/Pictures/ubuntu_logo.jpg'));

ERROR 1048 (23000): Column 'picture' cannot be null
This error occurred because the result of LOAD_FILE('/home/user1/Pictures/ubuntu_logo.jpg') has return the NULL value probably due to privileges and permission of the /home/user1 directory which is belongs to user1.
The same problem also has been brought up in mysql forum.
After checked on /etc/passwd, it shows that the mysql's home directory is located at /var/lib/mysql/, where permission is fully given for mysql user.
Simply login as root user and copy the image to /var/lib/mysql or you may created your own directory such as /var/lib/mysql/all_images
$ sudo su

$ mkdir /var/lib/mysql/all_images

$ cp /home/user1/Pictures/ubuntu_logo.jpg /var/lib/mysql/all_images
Now, try to run the same insert command again with different directory.
mysql> insert into myimages (name, type, picture) values ('bz', 'jpeg', LOAD_FILE('/var/lib/mysql/all_images/ubuntu_logo.jpg'));

Query OK, 1 row affected (0.00 sec)
Yeah, it works!!

Friday, December 31, 2010
Manisnya 2010 :)
Sedar atau pun tidak, tahun 2010 dah nak berakhir pun. Biasa aku takde kisah sangat, tapi bile pikir2 cam banyak lak kenangan 2010 ni..dan yang paling touching sekali, banyak kenagan2 tu di lalu bersama :)
Computer Science Final Year Project (FYP), IIUM
awal2 tahun ktorang da wat FYP bersama, Alhamdulillah topic yang ktorang pilih tu agak simple dan ade research value, "Performance Evaluation of Clustered Memcached".
Terima kasih kepada Dr. Mohiuddin yang banyak membantu dan guide kami tuk siap kan sampai hari presentation (dah la ktorang present 1st, gile gementar.. haha ) dan sebelum hantar untuk conference. Tak lupe jugak pada parents, kawan2 yang sesame wat FYP, sume da banyak bagi semangat and tolong mane yang patot.. terbaek lah.. hehe.. ^_^

Ni time final presentation..
Internship at MIMOS Berhad
Bile FYP selesai pada pertengahan tahun (malas aku nak ingat bulan bape.. hoho), kami pun bergegas mencari tempat tuk 6 bulan internship atau nama mesra nye 'practical'.. actually, banyak gak tempat ktorang apply.. erm, banyak gak ktorang dapat.. tapi nak wat camne, dapat tempat intern pun same.. hehehe.. seronok kan (xtau la korang camne, aku for sure happy.. haha) kitorang pun dapat kt Mimos, Bukit Jalil under Wireless and Communication Solution Cluster, 6LoWPAN group.
Kalau nak citer camne life kat sini, memang sampai bsok xhabis2.. hahaha.. Pendek kata,
- Supervisor and staff BEST!!!! Special thanks to Reza Khosdel, Zeldi, Gopi (examiner aku mase present FYP), Shariq, Abbdu, Moshi, Dr Mazlan, Kak Lina dan Mdm Normi.. dapat A tu, Alhamdulillah :)
- Geng Intern pun best, Abul, Kok Jin, Mint, Dayang, Chui and Fakrol
- dan last, ofkos la my partner.. sporting gilerrr woo.. hihi
- lupe lak, yang paling obvious aku naik 8 kilo kat sini, supervisor ktorang pun sebenarnya da macam mentor makanan.. Terbaek! Filosofi dia, "People who enjoy foods, will enjoy life" Ktorang salu makan kat Halfmoon, Pizza hut, MMU food court etc sume sodap2 belaka.. lapo pulak rasa.. :P

Supervisor ktorang, amacm?? hensem x? Reza Khosdel dan Zeldi Suryadi..

Geng intern (dayang, mint, ina, aku yg xbape nak nerd nidan kok jin)
minus abul, chui dan fakrol :)
ICT4M 2010 Conference, Jakarta
9 Dec 2010, 9.00 pm, Tiba di jakarta
Hoho.. nak ikot kan ni yang paling best bile kami dapat2 jalan Bandung dan Jakarta, shoping sakan kot. Tapi paling lame kat bandung la, 3 hari. Ada 1 hari tu, dekat 6 jam ktorang pusing 1 pasar baru tu.. dasyat2..hahaha
Pengalaman yang tak dapat dilupakan bile time conference, sume authors tu lecturer, master dan Phd.. tekezut aku.. tapi best sebab makanan bes.. hehe :D
Aku pun da malas tulis panjang2.. aku post je la.. hahaha..

Jalan2 di Bandung..

UIN, Jakarta: hepi nampak cik kak..haha
 Selepas presentation.. lega rase nye.. hehe
Slide tuk present..
Summary: yang penting.. kerja sama :)
Tuesday, December 7, 2010
Saturday, October 30, 2010
\WINDOWS\SYSTEM32\CONFIG\SYSTEM corrupted

What i did to solve is, put on Windows XP CD and boot into CD mode. Then, wait until it will prompt with few options, like for installing fresh windows and repair. Choose option to repair by press 'r'.
Next step, you will see command line interface (CLI). It will show an option for partition (i.e C: or D: ). Just choose the number where you have installed the windows. In my case I press 1 for partition C. Then, it will ask for administrator password. If you did not set any password for admin, just leave it blank and press ENTER.
You will see like this.
C:\WINDOWS>
Here, I run check disk instead of copying corrupted files.
C:\WINDOWS>chkdsk c: /P /R
Note that c: is the partition drive of the installed windows. See the manuals from run:
'chkdsk /?'
Then wait for about 30 minutes (according to size) until 100% completed. After finish type 'exit' to reboot
Thats all, hope it will solve yours =)
Wednesday, October 20, 2010
Time is Moving ..
 Now i realize that i'm about to finish my 6-month internship and start a job at new company..hope everything will be always fine..amin :)
Wednesday, September 29, 2010

Monday, September 20, 2010
Windows Media Center VIRUS: what to do?

Last weekend my friend come to my house and bring his new laptop with new problem. All programs cannot be opened because registry is corrupted. I try to open any program, includes mozilla, yahoo messenger,cmd and regedit, but this crappy windows 7 always redirect to open Windows Media Center. All programs' icon turn to windows media center. I try to ask google and it is actually a virus. What we need is repair the registry that fooling windows user.
The solution is:
download this registry file HERE, and double click on it.
or copy paste these two lines into a file and save it file.reg. Then, double click it.
Windows Registry Editor Version 5.00
[-HKEY_CURRENT_USER\Software\Microsoft\Windows\CurrentVersion\Explorer\FileExts\.exe\UserChoice]
Then reboot to restore your icon as normal.
Hopefully this will help u :)
Reference:
Tuesday, September 7, 2010
Jom Download Lagu Raye :)
Kepada kawan2 ku semua, Selamat Hari Raye Aidilfitri Maaf Zahir Batin.
ucapan sudah ku kata kn, maaf pn sudah ko pohon kn.
sekarang mari kita bergumbira dgr lagu raye..hehe.
download la di sini (Thanks to authors, artists and producers)
Monday, August 30, 2010
Cool GMAIL
Gmail alias Google mail boleh undo send.
Mulai hari ini jangan risau salah send lagi :)
>> Undo "Send" in Gmail
Mulai hari ini jangan risau salah send lagi :)
>> Undo "Send" in Gmail
Thursday, August 26, 2010
Why Google?
Hai semua.
Saya mencari-cari Google fact sheet dan saya jumpa ini:
 **kredit pada Pingdom untuk gambar di atas
Google memang hebat. Sudah jadi bisnes yang sangat menguntungkan. Tapi apa yang saya nak kongsi ini sangat tak ada kaitan dengan gambar di atas. Sejak belajar dalam kelas Pengurusan Sistem Rangkaian dengan guru yg saya sangat hormati, saya menjadikan Google sebagai 'best friend' nombor 1 saya. Hari ini saya rasa kawan baik saya yang ini boleh jadi lucu. Dan saya rasa sangat lucu, sampai saya menulis entry ini dalam bahasa Melayu. :e
Gambar di bawah berbicara dengan sendiri (self-explanatory)

Saya mencari-cari Google fact sheet dan saya jumpa ini:
Google memang hebat. Sudah jadi bisnes yang sangat menguntungkan. Tapi apa yang saya nak kongsi ini sangat tak ada kaitan dengan gambar di atas. Sejak belajar dalam kelas Pengurusan Sistem Rangkaian dengan guru yg saya sangat hormati, saya menjadikan Google sebagai 'best friend' nombor 1 saya. Hari ini saya rasa kawan baik saya yang ini boleh jadi lucu. Dan saya rasa sangat lucu, sampai saya menulis entry ini dalam bahasa Melayu. :e
Gambar di bawah berbicara dengan sendiri (self-explanatory)

Saturday, August 21, 2010
Intel Dual Core Processor: Core 2 Duo vs Core i3 (new generation)

My head has been playing with the difference between core 2 duo (older) and core i3. Then, I start exploring Intel website and find what i3, i5 i7 are all about.
In this post, I simply compare this two processors. I referred to the site on core 2 duo and core i3 specification. Both are similar in term of processor number (2 cores).
The main differences are the number of threads and cache type.
Older dual core processor doesn't enable thread for each core as compared to current generation such as i3, i5 and i7. Core i3 has the capability to run dual thread on each core, thus total threads number can run in core i3 is 4 threads. Same as goes to other processor in this family, i7 has up to 8 threads can be ran on (each 2 or 4 core).
Core i3 used new smart cache (L3 cache) instead of L2 cache, as defined by Intel:
"Smart Cache is Intel’s performance-maximized data storage, which allows each processor core to dynamically utilize up to 100% of available cache and obtain data from the cache at higher throughput rates"
For gamers, here is a benchmark i found.

References:
Thursday, August 19, 2010
Fedora: Install & configure Net-SNMP running on IPv6
I've install net-snmp on my fedora machine for 'secret' purpose :P
Here are some basic tutorial but it works for me and perhaps all fedora user. I've experienced some errors if directly install the net-snmp. Thus, I try to install perl first (latest version) before installing and afterwards I didn't face any error to install.
Step 1: Installing Perl from source
Download tar ball (.tar.gz) of the latest version with type (maint) here
login as root, go to directory where the tar ball is located, extract and go inside directory
$ su
# tar xzvf perl-version.tar.gz
# cd perl-version
now, we configure (with default setting) to confirm with your platform
# ./Configure -de
compile and install
# make && make install
Note that it won't be installed if there is an error
if it is successfully installed, try . .
$ perl -v
output will be the version of newly installed perl. In my case:
This is perl 5, version 12, subversion 1 (v5.12.1) built for i686-linux
Step 2: Installing net-snmp from source
Go to net-snmp page and download source file (.tar.gz) under 'current release'. Same thing, extract the tar file
# tar xzvf net-snmp-version.tar.gz
# cd net-snmp-version
Then, configure using several option (press enter for each prompt)
# ./configure --enable-ipv6 --with-transports="UDP UDPIPv6" --with-libs=-lpthread --with-perl-modules
finally compile and install
# make && make test && make install
remember, if any error occurs installation won't finish
Step 3: snmpd configuration file
Go to snmp directory
# cd /usr/local/share/snmp
Then, we can create snmpd.conf file using this command
# snmpconf
Would you like me to read them in? Their content will be merged with the
output files created by this session.
Valid answer examples: "all", "none","3","1,2,5"
Read in which (default = all): none
next . .
I can create the following types of configuration files for you.
Select the file type you wish to create:
(you can create more than one as you run this program)
1: snmpd.conf
2: snmptrapd.conf
3: snmp.conf
Other options: quit
Select File: 1
Lastly, type 'finished' and 'quit'. You will get output like this
The following files were created:
snmpd.conf
Now, edit this file and replace with all content posted here
# gedit snmpd.conf
and add this line after this line '# sec.name source community'
[...]
com2sec6 local ::1 public
[...]
save the file and close.
Now, Run snmpd first just on udp with IPv6 on port 161 (as root)
# snmpd udp6:161
Then, try snmpwalk (You should have IPv6 configured)
# snmpwalk -v 1 -c public 'ipv6:[::1]' IP-MIB::ipAdEntIfIndex
Output will be somehow like this
IP-MIB::ipAdEntIfIndex.10.1.27.140 = INTEGER: 3
IP-MIB::ipAdEntIfIndex.127.0.0.1 = INTEGER: 1
If you got this, so i think it works ;)
Wednesday, August 18, 2010
Where is my installed Wireshark?
So this is what happen this morning where we installed wireshark on my Fedora 12 PC. It is successfully installed but executable file doesn't appear anywhere.
To install:
yum install wireshark
What you have to do is just further install:
yum install wireshark-gnome
Bye2 :D
Tuesday, August 17, 2010
Net-SNMP Tutorial
Just followed good tutorial to configure Net-SNMP >> click here
Anyway, I experienced error while 'make' where I got this error >>/usr/bin/ld: cannot find -lperl
I find the solution here
First, locate libperl.
Output:
(or similar)
Create soft link;
**Credit to http://ashokachakra.blogspot.com/
Anyway, I experienced error while 'make' where I got this error >>/usr/bin/ld: cannot find -lperl
I find the solution here
First, locate libperl.
Output:
/usr/lib/libperl.so.5.10
/usr/lib/libperl.so.5.10.0
/usr/lib/libperl.so.5.10.0
...
(or similar)
Create soft link;
sudo ln -s /usr/lib/libperl.so.5.10 /usr/lib/libperl.so
Make sure the link is in the /usr/lib **same directory with the link point.
That's all. Thank you.
**Credit to http://ashokachakra.blogspot.com/
Thursday, August 5, 2010
Playing your favorite radio station using Octoshape -- Linux (Little addition)
Okeh, I forgot to mention-- Uninstalling Octoshape.
In case your Octoshape doesnt work, or have any problem, or just you hate it, u want to remove it from your machine. Easy easy...
Just uninstall it from your machine. How to uninstall? Easy easy... -- Delete octoshape folder.
That is all.
If you want it back, re-install and enjoy. That's all. Have a nice day.
In case your Octoshape doesnt work, or have any problem, or just you hate it, u want to remove it from your machine. Easy easy...
Just uninstall it from your machine. How to uninstall? Easy easy... -- Delete octoshape folder.
That is all.
If you want it back, re-install and enjoy. That's all. Have a nice day.
Tuesday, August 3, 2010
Playing your favorite radio station using Octoshape -- Linux
2) Open terminal, go to the path you download the plugin . Then,
3) $ chmod +x octosetup-linux_i386.bin
4) $ ./octosetup-linux_i386.bin
5) Go through the license agreement by clicking enter or space and reply yes when being prompted.
Do you agree to these license terms? [yes|no]
yes
Archive: octoshape.installer.6085
inflating: octoshape/eula.rtf
inflating: octoshape/eula.txt
inflating: octoshape/OctoshapeClient
inflating: octoshape/setup.xml
extracting: octoshape/sua-1002170-0-confirmed.txt
extracting: octoshape/sua-1002170-0-dynfiles.zip
extracting: octoshape/sua-1002170-0-marker.txt
inflating: octoshape/sua-1002170-0-module.xml
inflating: octoshape/sua-1002170-0-OctoshapeClientSUA
extracting: octoshape/sua-1002170-0-OctoshapeClientSUA.sig
inflating: octoshape/sua-1002170-0-suapack-versions.txt
Go to octoshape and execute ./OctoshapeClient -url:octoshape:BROADCASTER.channel
Done installing.
6) You can play the radio at this point. But Octoshape default player is using MPlayer. You can either get MPlayer installed or, change default radio player by editing setup.xml (in octoshape folder)
$ gedit setup.xml
I am using rhythmbox, so I add this option.Add -- PlayerExec="rhythmbox $url"

Save.
7) FINALLY,
For FLY FM listener:
$ ./OctoshapeClient -url:mpb.flyfm.mp3.highFor HOT FM listener:
$ ./OctoshapeClient -url:mpb.hotfm.mp3.highSaturday, July 10, 2010
Streamyx: Sharing Internet on Fedora 12
I'm using streamyx for Internet connection at home. I've a laptop with an Ethernet card and a wireless card. Then, I started to google on how to share internet connection with other laptops using wireless connection since my LAN card is occupied with streamyx cable.
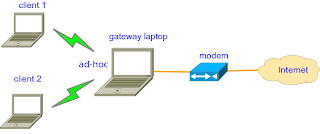
For setting up my machine as a gateway, it quite similar to previous post here, but it can simply be done by configuring firewall. Then, we can create an Ad-Hoc connection so that other machines (client) can simply connect to my laptop without the need of access point. In addition, in order to automatically configure IP address, gateway and DNS server address on client machine, we can set up DHCP server in the laptop (gateway machine). Following are the steps for make it works :
Note that all configuration is done on gateway machine.
Step 1: Connect to streamyx
Right-click on network manager applet, then choose 'Edit Connections..'
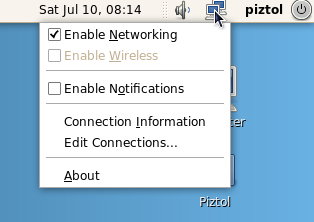
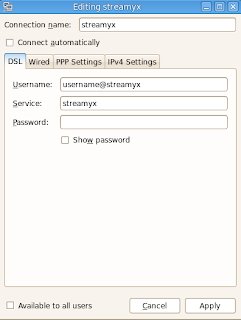
Select DSL tab and click 'Add' to add new connection. Then rename connection name to 'streamyx' or anything you want. Enter your username, password and service as shown in picture below. Tick connect automatically if want to allow connection on startup. Click 'Apply' to finish
Click on applet again, and now streamyx connection should be appear under 'Wired Networks'. Select to connect.
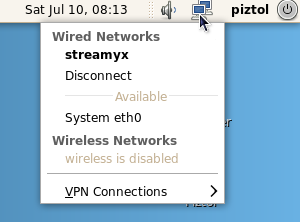
Step 2: Configure Firewall (from this step, all need to be done as root)
Open terminal and type
$ su
# system-config-firewall
Select 'Masquerading' and tick as bellow (thanks to KageSenshi)
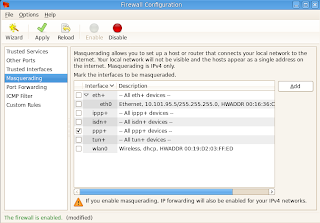
Step 3: Setup DHCP server
First, install dhcpd (in fedora 12, dhcp package is using version 4)
# 'yum install dhcp
Check your DNS server to be used in dhcp configuration file
$ less /etc/resolv.conf
Output should be appear like this
# Generated by NetworkManager
nameserver 204.177.0.3
nameserver 204.177.1.12
Then, edit dhcpd configuration file (use familiar text editor such as gedit, vi or nano)
$ su -c 'gedit /etc/dhcp/dhcpd.conf'
Then, make it similar as bellow and match the address of DNS at 'option domain-name-servers'
# beginning of file
default-lease-time 86400;
max-lease-time 604800;
authoritative;
ddns-update-style interim;
option domain-name-servers 204.177.0.3
,204.177.1.12
;
subnet 192.168.1.0 netmask 255.255.255.0 {
range 192.168.1.1 192.168.1.5; # only 5 person can connect
option broadcast-address 192.168.1.6;
option routers 192.168.1.1; # gateway address
}
# end of file
Step 4: Create an Ad-Hoc connection
Enable wireless connection, then select 'Create New wireless Network'
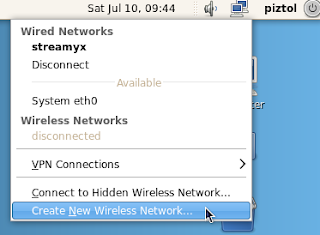
Choose any wireless security you want or simply choose none. Click 'Create' to finnish.
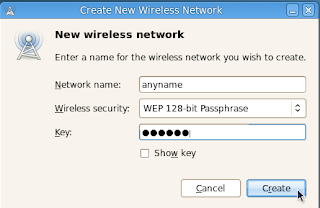
Again right-click on the network manager applet and choose 'Edit Connections'. Then, under 'Wireless' tab, select your connection name and edit as follow
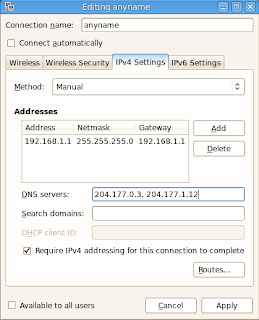
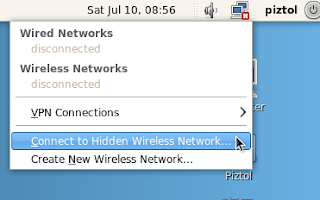
Click on applet, and select 'Connect to Hidden Wireless Network' and connect.
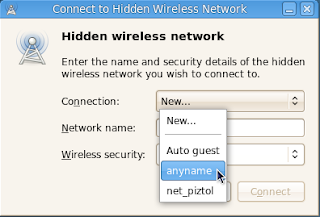
Finally, restart dhcp server
# sudo service dhcpd restart
Note that you need to connect to the created ad-hoc connection first (in my case, it is 'anyname') before you can start dhcp server.
Now, everyone near to you can see you Ad-hoc connection. Configure client's IP address using 'automatic configuration'. Once they connect to your ad-hoc connection through WiFi, they can surf to internet and facebooking all the time :P
References:
Sunday, June 13, 2010
IIUM FM

I'm IIUM student :) and I'm glad that IIUM has it own radio, which is broadcasting over the Internet. Users could simply go to this page http://livestream.iiu.edu.my/iiumfm/ and it will stream the radio using supported player in web browser. Nice huh?.. Hehe.
Beside that, for Linux user, you can simply use Rythmbox as follow:
Step 1: Make sure plugins are installed
ubuntu user,
$ sudo apt-get install ubuntu-restricted-extras
and fedora,
$ sudo yum install gstreamer-plugins-ugly gstreamer-plugins-bad gstreamer-ffmpeg
It is also necessary to install a bunch of codecs in here
Step 2: adding link
open your rythmbox, go to menu 'Music',click on 'New Internet Radio Station' and add this url
mms://livestream.iiu.edu.my/iiumfm
Then, go to side bar on Radio, then double click on the new added link.
That's it. Enjoy ;)
Monday, April 19, 2010
Fedora: Change Root Directory of Httpd
I recently try to install apache on fedora 12. I need to change the root directory to ease me editing file and avoiding permission. It is quite different when I was configuring on ubuntu. After read through several forums I come to this post. So, I won't be crazy for the next time.. haha
The default root directory is at /var/www/html. In my case, I want to change it to /home/user1/web.
Step 1: Edit apache configuration file (as root)
# gedit /etc/httpd/conf/httpd.conf
Find these two lines
DocumentRoot "/var/www/html"
...
...
#
# This should be changed to whatever you set DocumentRoot to.
#